Material List
The material list shows every material in the current blend file. It updates automatically when the scene changes.
It is the top part of the Material Manager panel and has three parts.
- List header. Refresh, search, sorting and filters.
- Material rows. One row for each material, with its markers and buttons.
- Material actions. Buttons that create, rename and clean up materials.
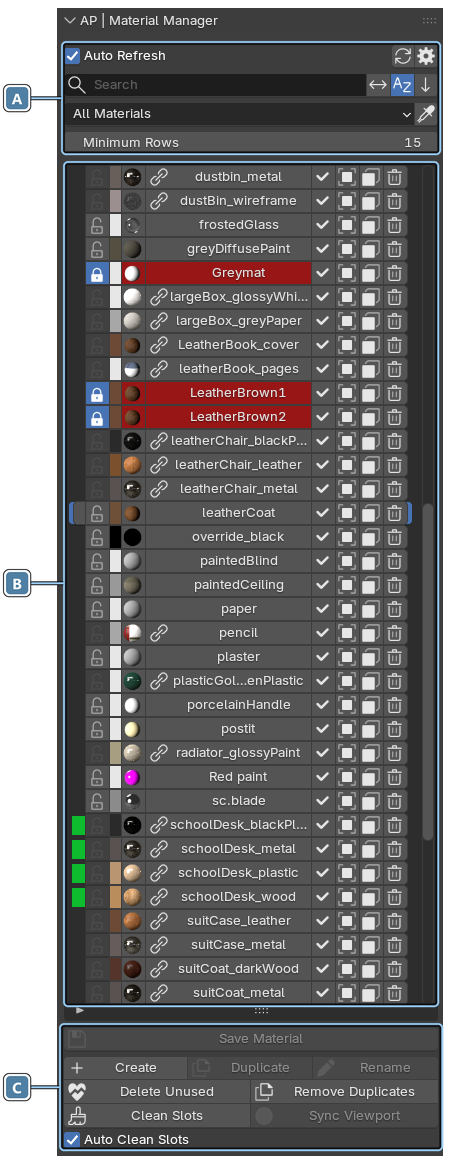
AList header
- Auto Refresh. Keeps the list updated as the scene changes. Turn it off in very large or slow scenes.
- Refresh. Updates the list manually. Use it when Auto Refresh is off.
- Preferences. Opens the add-on preferences.
- Name filter. Shows only materials whose names contain the text. Upper and lower case do not matter. Use
*for any text in between, for exampleleather*metalfindsleatherChair_metal. - Invert filter. Shows the materials that do not match the name filter.
- Sort alphabetically. Sorts the list by name. When it is off, materials keep the order in which they appeared, and new materials stay at the end even after renaming.
- Reverse sort. Reverses the order of the list.
- Filter mode. Limits the list to one group of materials. See Filter modes.
- Pick Material. The eyedropper. See Pick Material.
- Minimum Rows. The minimum height of the list. Drag the handle under the list to show more rows.
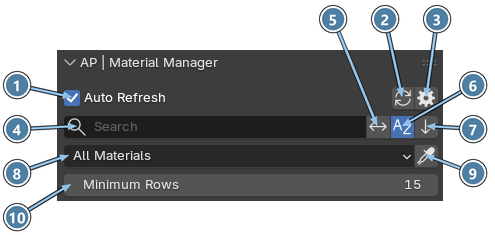
Filter modes
| Mode | Shows |
|---|---|
| All Materials | Every material in the blend file. |
| Active Scene | Materials used anywhere in the current scene. |
| Used Materials | Materials used anywhere in the file. |
| Unused Materials | Materials not used by any object or scene. Protected materials are included. |
| Linked Materials | Only materials linked from external blend files. |
| Selected Object Materials | Materials used by the selected objects. |
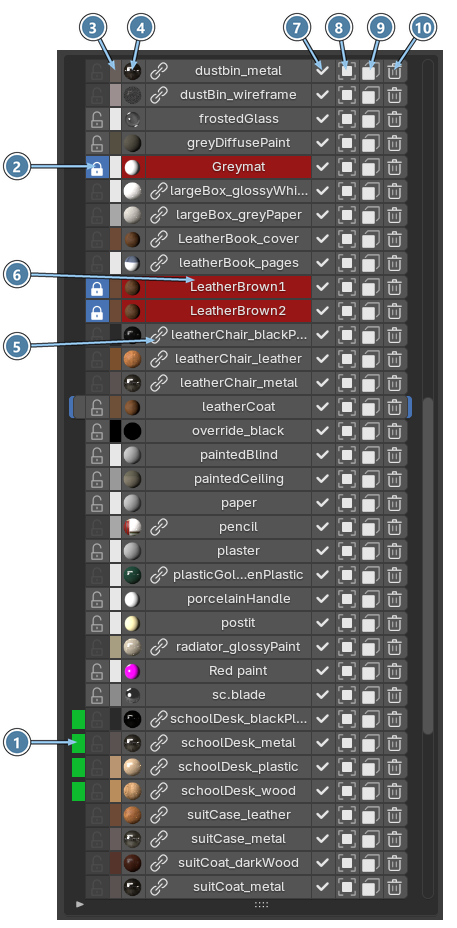
BMaterial row
Each row of the list is one material.
- Selection marker. A bright green bar means the material is used by the selected objects. A dim green bar shows the materials of objects that were deselected when you selected a material. Click it to restore that selection. See Selection markers.
- Lock. Turns on Fake User. Delete Unused and Remove Duplicates do not touch locked materials. See Cleanup Tools. Click again to unlock.
- Swatch. The material's Viewport Display Color. You can change it here. This does not change the shader Base Color. The swatch can be hidden in the Preferences.
- Preview. A small render of the material.
- Linked material. A chain icon means the material is linked from another blend file and cannot be edited here.
- Name. Click to select the material in Material Manager. The material also opens in the Material tab of the Properties editor and, if a Shader Editor is open, in the Shader Editor. Double-click to rename the material. A red name means the material is not used anywhere.
- Assign To Selection. Assigns the material to the selected objects, or to the selected faces in Edit Mode.
- Select Objects. Selects objects that use this material. If several objects are selected, it searches only inside that selection. Otherwise it searches all visible objects.
- Select Faces. Selects all faces that use this material in the selected objects, or in all visible objects if nothing is selected.
- Delete. Deletes the material and removes it from every object that uses it.
Selection markers
When you select a material in the list, Material Manager deselects the objects in the scene. Without help, the bright markers would disappear too, and you would lose track of which materials those objects use.
That is what the dim markers are for:
- Select an object with several materials. Its materials get bright markers.
- Click one of these materials in the list. The object is deselected, and the bright markers turn dim.
- The dim markers stay, so you can go through the object's materials one by one and check each of them.
- When you are done, click any dim marker to restore the selection you had before.
Tip
You can combine Select Objects and Select Faces into one button in the Preferences. Then a click selects objects and Ctrl-click selects faces.
CMaterial actions
- Save Material. Saves the material selected in the list to your Material Library.
- Create. Creates a new material.
- Duplicate. Creates an independent copy of the material selected in the list.
- Rename. Renames the material selected in the list. Name conflicts are resolved automatically. You can also rename a material by double-clicking its name in the list.
- Delete Unused, Remove Duplicates, Clean Slots, Sync Viewport and Auto Clean Slots. See Cleanup Tools.
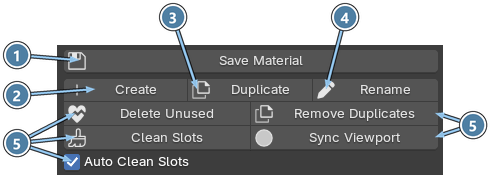
Buttons that cannot be used right now are dimmed. Hover over a dimmed button to see why, for example No material selected or Read-only materials cannot be renamed.
Pick Material
Click the eyedropper and then click any object in the 3D View.
- Click selects the nearest material under the cursor.
- Alt-click shows a menu with all materials under the cursor, so you can choose one.
The picked material becomes selected in the list.