Material Asset Browser
The Material Asset Browser section shows materials from your Blender Asset Libraries, the same libraries you see in Blender's Asset Browser editor. You can assign or link them without leaving the 3D View. The section is the last one in the panel, below the Material Library. See the Interface Overview.
Hidden by default
Turn on Show Material Asset Browser in the Preferences to show this section.
Browser tools
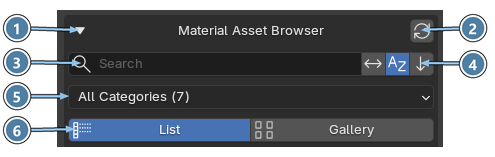
- Section header. Click to expand or collapse the section.
- Refresh Asset Libraries. Rescans all Blender Asset Libraries and updates the previews.
- Name filter. Shows only materials whose names contain the text. Upper and lower case do not matter.
- Invert filter, Sort alphabetically and Reverse sort. The three buttons right of the search field. They work the same way as in the Material List.
- Category. Shows materials from one asset catalog only. The number shows how many materials are listed.
- Display mode. List or Gallery.
Asset actions
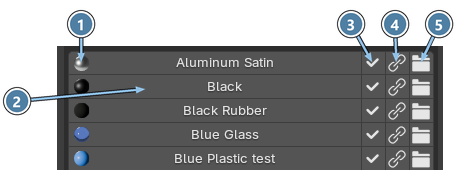
- Preview. A small render of the material.
- Name. Click to show a larger preview. Hover over it to see the asset category and the path to its
.blendfile. - Assign Material. Adds the material to the project and assigns it to the selected objects or faces.
- Link Material. Links the material from the library file and assigns it. A linked material stays in the library file and cannot be edited in your project.
- Show in File Explorer. Opens the folder that contains the library
.blendfile.
Assign or Link?
Use Assign when you want to change the material in this project. Use Link when the material must stay the same in every project that uses it.